Friday 11 June 2010

DIY Workbench

created at: 2009-05-25
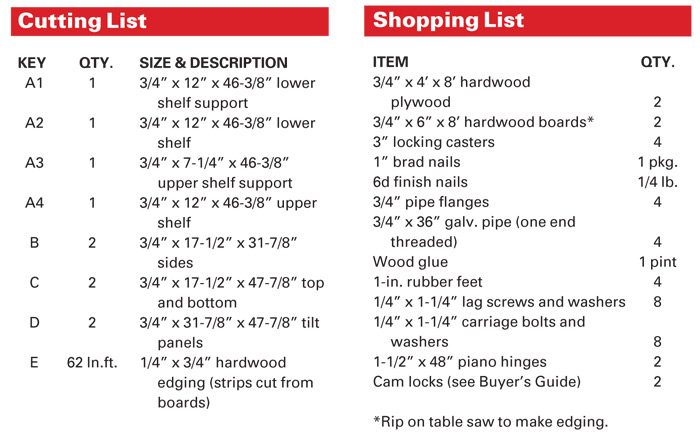
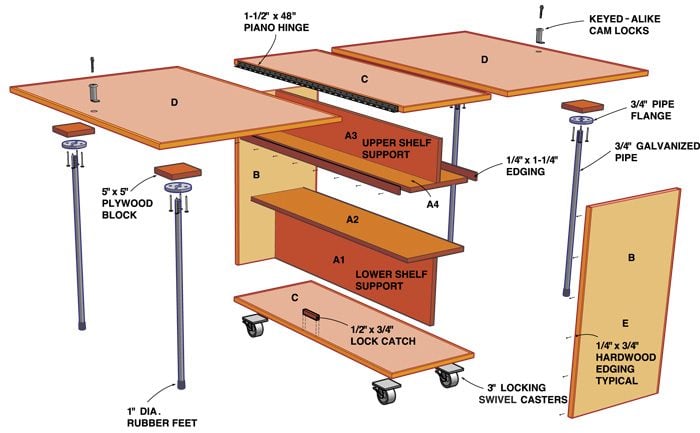
After looking at the various workbench offerings at Sears, Home Depot, and Lowes, I decided to go DIY.  I knew I could make a better, more modular workbench myself by reusing parts of my existing setup and buying off the shelf components from the hardware store.  I inherited my old workshop from the previous owner of my house and he built it out of old laminate closet storage units and three bathroom vanities.  It was bulky, inefficient and crowded and I wanted smarter storage and a more open workspace.

The old workbench was sturdy and sized well, so I decided to keep the guts of it and just pull off all of the front trim panels, doors, and drawers from the vanities.  I also took down all of the laminated shelving that was above the work bench.  I always hated the way the shelves stuck out too far from the wall (24") and hovered too closely over the work surface.  After I gutted the old setup, I started building the new one with an eye towards adaptability and future customization.

For tool storage, I knew I wanted pegboard and a small toolchest with drawers.  I bought eight 16"x16" interlocking plastic pegboard panels and peghook assortment sets from Home Depot.  Although they were the costliest part of this project ($48), the plastic pegboard was a lot more durable than a sheet of 1/4" pegboard and I knew they'd be a better long term solution.  I mounted them directly onto the studs and they are very sturdy.  I got a lucky break on the tool chest, my coworker had a brand new Craftsman 4-Drawer Rally Box that he gave me for free!  I found a roll of Kobalt anti-corrosion drawer liner on sale at Lowes and cut pieces to fit for each drawer.

I lucked out on the power strip as well.  I rescued a completey functional four foot 15A strip from a pile of electronics that were destined for the recycling center.  I fastened it to the wall underneath the pegboard, right above my benchtop.  Now I have plenty of outlets to plug in power tools, recharge my cordless drill and power the bench work light.

To store power tools, parts and other hardware, I opted for lots of shelves and storage bins in various sizes.  I bought a bunch of Stanley Tools storage bins (sizes #2, 4, and 5) to put stuff in, and a four foot wide Closetmaid Maximum Load wire shelf to mount over the pegboard. The shelf is great for storing large boxes and also serves as a place to hang a 24" fluorescent light fixture.

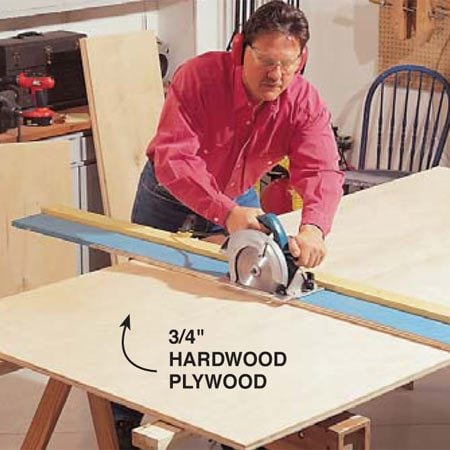
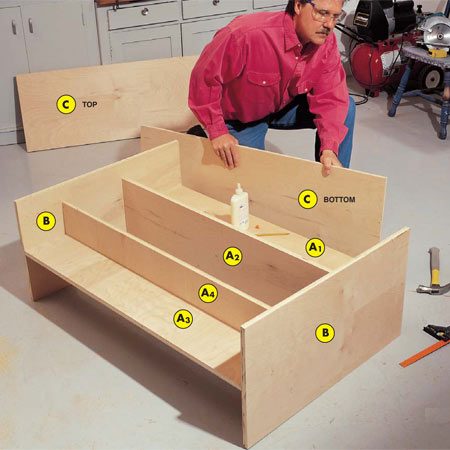
I bought a 4x8 sheet of 5/8" particle board and had Lowes cut it into pieces for me so I could make shelves, then I arranged the shelves to best fit my tools and put everything that I could into the #4 and #5 storage bins.  I had a few other unused bins and a milk crate on hand so I fit them in there as well.

I wanted to store tiny parts in small pick bins and have those bins easy to reach, but I didn't have the wall space to make that happen.  To work around that, I took one of the new shelves and reused a set of the drawer slides to make a slide out shelf.  I screwed 10 stanley #2 pick bins into the shelf so they'd stay put when I slide the drawer in and out.  It works well--I have plenty of drawer slides left so I might make another one of these in the future, should I need it.
created at: 2009-05-25
I'm really happy with the way this project worked out.  It was fun to plan and build it and it only cost me about $200 to get exactly the kind of workbench I wanted.

The dream of a terminologist

I’m dreaming of a terminology workbench. A software environment with customizable terminology management work-flow. Such a program should (just like a translator’s workbench for the translation process) automate the different steps of terminology management and information acquisition.
terminology workbench
Which components should be included in a (multilingual) Terminology Workbench?
-WebCrawler with filters
-Lemmatizer, POS-tagger, tokeniser, segmentation tool, (for different languages)
-Word- and sentence alignment components
-Translation memory database and editor
-Textanalysis with linguistic components (word concordance, collocation  patterns, etc.) and a statistical component (frequency, T-score, chi-square etc.)
-Terminology extraction (with customizable filters)
-Terminology database
-Web-based and multi-user interface

To my knowledge, no such tool has been introduced yet. (please let me know if I’m wrong). There are some commercial software packages which include some of these modules in separate programs. But there is simply no tool which includes all the components a terminologist needs using one single interface. It’s such a shame because for each task mentioned above, there is an open source or free software available. So it’s just a matter of taking, say, WebReaper, HunAlign, AntConc, Olifant, Xbench ApSic, GlobalSight, Twente word aligner, OmegaT+, etc. and combine these tools into one powerful Terminology Workbench.  

I do know about two interesting initiatives aimed at the development of a Terminology Workbench but these also don’t include all the functionalities I’ve listed above.
One of these initiatives is TerminoWeb, a research project of the National Research Council of Canada. As we can read on the website “The TerminoWeb project focuses on the development of a technology which will allow, as a medium term objective, the automatic construction of specialized ontologies (i.e. ontologies for specific domains), converging in this way with the study of terminology.” (Source: Website of NRCC)
I’ve had the chance to try this software which is still in development. It has an interesting approach to terminology extraction and corpus management. Some more about my findings maybe in another blog.

The other tool is called IHTSDO Global Health Terminology Workbench which is part of the famous SNOMED CT (Systematized Nomenclature of Medicine — Clinical Terms), “a systematically organized computer processable collection of medical terminology covering most areas of clinical information such as diseases, findings, procedures, microorganisms, pharmaceuticals etc.” (Source: Wikipedia). Unfortunately, I haven’t had a chance to try this one. As far as I know, it’s impossible to download a demo or try it online. The SNOMED CT database with concepts and term descriptions is however online accessible. It is quite impressive!

As I said both projects are interesting and have their merits but the “ideal” Terminology Workbench isn’t there yet. So everyone out there, from providers of language software to the open source community, there is still some work to be done!

Thursday 10 June 2010

Folding Workbench Fit a huge work area into a small space with this folding workbench

Overview

Here’s a workspace that’s huge and accessible from all sides yet folds up and stows away easily. If you don’t have room for a full-size permanent workbench but really need space to spread things out, this workbench is it. It opens to a solid 4 x 7-ft. surface with both wings up, yet closes and rolls into a small 4-ft. x 18-in. spot in a corner of the room. It’s a perfect workspace for the garage or basement. It’s also a great surface for making repairs, working on hobbies, cutting sewing patterns, wrapping gifts, folding laundry, doing stained glass crafts or even just holding a mechanic’s parts.

This project has no complex wood joints. Just straight cuts, careful measuring and some nailing and screwing.

Cutting and 
Shopping Lists
Cutting and Shopping Lists
Exploded diagram
 of workbench
Exploded diagram of workbench
Figure A: Folding Workbench Details
With this illustration, and the Cutting and Shopping Lists, you have the basics for building your own folding workbench.
You can see and print and enlarged version of Figure A and the Cutting and Shopping Lists in the Additional Information section below.

Assembly is as simple as glue and nails

Take a look at the Cutting List and cut all your pieces from 3/4-in.-thick hardwood plywood. I used birch plywood from a home center, but any flat plywood sheet will do. Avoid construction-grade plywoods because they’ll often have bows or warps that’ll make precise fitting impossible. I strongly recommend you use a guide (Photo 1) to cut the plywood. You’ll have tighter-fitting joints and better glue bonds.

Once all the plywood pieces are cut, rip the 1/4-in. wide edge banding from 3/4-in. thick boards (or buy it precut from a home center or lumberyard if you don’t have a table saw).
Assemble the upper and lower shelves as shown in Fig. A and Photo 2 with carpenter’s glue and 6d finish nails. Note: Don’t alter the design of the shelves for this workbench. The large shelf supports (A1 and A3) on the bottom and top of the shelves keep the bench from racking out of square. Glue and nail the sides to the shelf ends, then let the assembly sit for an hour to let the glue dry before attaching the casters as shown in Photo 3.

Use 1-in. brads for attaching the hardwood edging

The thin hardwood edging is a necessary component of the bench; without it, the hinge screws would not hold as well and the plywood could delaminate along the edges. To apply the edging, start a few brads into each piece of wood edging, put glue on the plywood and tack each piece into position (Photo 4). Once the edging is tacked in place, nail it every 6 in. with the brads. When the glue is dry, sand the sharp corners of the edging.

Piano hinges are the key to this bench

Piano hinges are a pain in the neck—all those tiny screws. But all those screws give continuous support along the joint for a sturdy worktop. Be sure to align one hinge blade with the top (C) and the other with the top of panel D. Use a hinge center punch like the one shown or a Vix bit, a special drill bit that’s self centering. Screw the hinges securely in place with the screws provided.

Glue and screw the blocks to the underside of each panel (D) to support the 3/4-in. pipe flanges and pipe legs. I bought 3-ft. lengths of pipe, threaded on one side, and found that I needed to cut (with a hacksaw) about 1 in. off this length. This allowed room for the flanges and the rubber feet.

The locks serve a dual purpose. First, they keep little hands from getting into things and getting pinched, and second, they’ll keep everything inside from tipping out if the bench is jarred. To install them, drill the holes for the lock (Photo 7) and glue a wooden catch to the bottom of the shelf as shown in Fig. A. Measure the shaft of the lock once it’s installed to get the correct thickness for the block. We used a 1/2-in.-thick block for ours.

Apply a finish for more color and protection

Remove the hardware to make painting or varnishing a whole lot easier. Label the panels in a hidden spot so you get the right on the right side when you assemble. Small variations from one panel to the next can show up on your hinge placement and locks.

Sand the entire bench with 150-grit sandpaper and use a power sander to knock down any high spots on the hardwood edging. Vacuum the dust, wipe the bench down with a tack cloth and apply your finish. Wait a few days after the last coat of finish to let it cure before you put your first scratches on the workbench.

Knock Down Workbench

As a school woodshop teacher, I must often solve problems on the spur of the moment. That's how the design for my easy-to-build workbench came to me. A couple of kids wanted to build a bench as a gift for a neighboring preschool. The bench had to be quick and easy to construct, yet professional looking and, above all, absolutely rigid. When all the elements for a simple, bolt-together frame came together in my mind, I hit my palm to my brow. It seemed so obvious. I wondered why I hadn't thought of it before.

workbench2.jpg


Designing the workbench[b1] workbench1.jpgThe workbench mainly consists of four legs and four stretchers held together with eight identical joints. The joints are easy to cut yet forgiving because they are fastened with common hex-head bolts available at any hardware store. The joint, equally effective in hardwood or cheap construction-grade lumber, is also perfect for many types of knockdown furniture. It's even solid enough for permanent installations, such as a built-in work counter. The first step in building the frame is to decide the dimensions of the top. This decision should be based on the bench's intended use (a carving bench should have a narrower top than a cabinetmaker's assembly bench) and on the shop space you have available. The bench I built has a 42-in.-wide by 72-in.-long top, good for general woodworking tasks. From these dimensions, I calculated the size of the frame and the length of the stretchers, You can determine the length of each pair of stretchers by subtracting twice the thickness of a leg plus the amount the top will overhang at each end from the length and width of the benchtop. When deciding on the amount of overhang, keep in mind that it's a good idea to leave plenty of room on all sides, for mounting vises and for clamping things to the top. For example, I chose a 7-in. overhang and used 3-in.-thick by 3-in.-wide legs, so my end stretchers were 22 in. long and the side stretchers were 52 in. long. I made my stretchers from 2x6 stock.

I used soft maple for my bench's legs, but you can use glued-up hardwood or construction-grade 4x4s. Cut the legs to a length that equals die height of the bench less the thickness of the top. I find that bench height is largely a matter of personal taste.

I'm a six footer, and I like a 34-in.-high bench whenever I'm sawing or plan- ing wood; for small assembly work, though, I'd want the benchtop an inch or two higher. The workbenches in my school shop are 30 in. high, which is right for most adolescents, although younger woodworkers might do best with a 26-in.-high bench.

workbench11.jpgMaking the stretcher joints[b1] The function of a stretcher is to prevent the frame from racking and the bench from rocking, so it's imperative that each stretcher connection be rock solid. A joint held together with a single bolt focuses pressure at the center of the joint, which doesn't adequately prevent the joint from racking. Two bolts are better because they pull the stretcher against the leg closer to the edges, thus keeping the joint square. But you need to buy twice as much hardware, plus it takes twice as long to knock down or assemble the bench. After trying several variations of the bolted stretcher joint, I finally came up with the version shown in the drawing. A single bolt is used for each joint, and an arched relief area is cut out on each end of the stretcher. As the joint is tightened, pressure is focused at the outer edges (like a two-bolt joint), effectively locking the stretcher square to the leg and preventing racking.

To begin making the joints, crosscut the stretchers square and to length, and drill cross holes to provide the space for the nut and washers that are fitted to the end of each bolt.

The center of each cross hole is located where the bolt end will be when the joint is assembled. For my bench, I used 3-in.-sq. legs and 6-1/2-in.-long bolts with the heads countersunk 1/2- in. deep. This places the center of my cross holes at 3-1/2-in. from the end of each stretcher. You should avoid locating the cross holes any closer to the stretcher ends than that or you risk the force of the bolt splitting out the endgrain and ruining the stretcher.

Bore out the cross holes with a 1-1/4-in -dia. bit, which will leave a hole large enough to allow a box wrench to fit around the nut during assembly. Next, the portion of the hole facing the end of the stretcher is squared up for the nut. I used a try square to mark out the pocket, as shown in the drawing. Then I chopped out the waste with a chisel. If you like, you can whittle or sand the edges of the opening to give them an attractive chamfer.

To locate the bolt holes in the ends of the stretchers, I made a thin-plywood (you could use cardboard) template cut to the same dimensions as the cross section of a stretcher, in this case about 1-1/2-in. by 5-1/2-in. The template is used to mark the center for each 3/8-in.-dia. bolt hole, and then these holes are drilled through until they intersect with the cross holes. A spade bit in a portable electric drill works fine in endgrain, although I prefer to use a modi-fied auger bit in a hand brace. To modify the bit, I just filed the spurs off, and it chewed right through endgrain. I tried to drill accurately by checking that the bit was parallel to the face and edge of the stretcher, and stopping and rechecking frequently. Because the hole is much larger than the bolt, dead accuracy isn't necessary; as I've said, this joint is very forgiving.

If you plan to disassemble and assemble the bench often, you might want to add an alignment dowel on the end of each stretch-er. This short, 1/2-in.-dia. dowel keeps the stretcher aligned during assembly and mates to a slightly oversized hole in the leg.

Next, mark and cut out the relief area on each stretcher end, leaving two l-in.-long contact areas. A 1/4-in.-deep relief is all you need, but if you'd like to add a decorative touch, you can cut a fancy shape; just avoid cutting too near the cross hole or you'll risk splitting the joint when you tighten the bolt. I cut out the relief area on a bandsaw, but you could use a sabersaw or chop out the waste by hand with a chisel.

Use the same template described above to mark the positions of the bolt holes on the legs. Each pair of legs is laid out differently, so be sure to mark carefully. If you choose to countersink the bolt heads, drill the countersunk holes first. A 1-in.-dia. hole matches the diameter of washers normally used with 3/8-in. bolts. Drill the bolt holes oversized— 5/8-in. holes for the 3/8-in. bolts-as you did on the stretcher ends earlier.

Assemble the bench frame by first bolting together the legs and end stretchers, and then joining them with the side stretchers. The joints will seem loose and sloppy when first assembled; simply posi- tion and tighten them using two washers under each nut. You might need to retighten the joints after they've settled for a few days.

Fitting the benchtop[b1] For my benchtop, I glued up some 1-1/2-in.-thick maple I had lying around. An easier (although more expensive) alternative is to buy a length of ready-made butcher-block countertop, available from many building-supply stores, home centers and lumber dealers. Bolt the top to the frame through a batten glued to the inside faces of the end stretchers (see the drawing). Bore three 3/8-in. holes in each batten, and then fasten the top with 3/8-in. lag bolts and washers. While the battens keep the top flat, the oversized holes allow the solid-wood top to move with changes in humidity. If you want to add a shelf under your workbench, screw battens to the underside of some 3/4-in.-thick shelf boards; then drop the shelf in place, as shown.

A Better Plan … under $ 10

My opinion with respect to a total of workbench plans is that you better spend your turn to, like the $ 5 – $ 10 and a little more to get what a real workbench plan step-by-step instructions with beautiful illustrations shouldCutting diagrams and shop tips and techniques. What I'm talking about here is planned that at least five pages of content (as opposed to photo-copy isometries that have some free pages) and some fairly good quality of the photos to the finished product. The photos alone can be a real life-saver savers, if you try to be all together, it will put together.

Free maps?

The next thing you notice with your online search is that many of the listings free advertising plans. Believe me, I have carefully gone through this "Free Workbench Plans"Sites and I can say without hesitation that this substance is mostly garbage. Like a lot of things on the Internet, it is simply a ploy to interest you look at something else … as a new cell phone or a free credit report.

The search for a workbench Simple Plan

If you have not noticed, there are tons of sites about building a workbench. However, be prepared to dig a little to find the kind of bench design, I have spokenOver there. Remember, most of the "bench" You plan on the Web are designed to find some pretty serious woodworking. You might look good but also for statements that you want to work on a planer, a drill, a router table to be prepared, and some other tools I've never heard of.